Lately I decided it was time to buy my first bench multimeter. Based on my idea of budget and requirements I went for the Siglent SDM3065X.
I decided for the 6 1/2 digits version because of its much higher accuracy compared to the 5 1/2 and 4 1/2 versions (and it should also have a slower calibration drift).
Many of the features, goodies and shortcomings of the SDM3065X/55X/45X have already been shown in youtube reviews. I’m very happy with my new DMM so far.
Among the well known and much advertised advantages of a bench multimeter over a portable one, such as accuracy, display size and brigtness, mains powered and always available, etc etc.. there is one feature in the recent bench DMM’s which is not so much talked about, but in my opinion very important and useful: the remote programming feature.
It allows you to write any algorythm that uses your measures (the most obvious being monitoring and data logging), and if your bench power supplies and electronic loads also allow for remote programming, you’re pretty much in control for implementing highly automated test workflows.

The SDM3065X, once connected to the LAN via ethernet port, will expose a SCPI service (documented here) usable by client applications. It can be accessed via USB too, but I find it less handy than a network connection.
To use it, you simply connect via TCP to the DMM’s IP address and start issuing commands and getting results. But there are libraries that make it much easier. The reference library is National Instrument’s “NI Visa”, in my case I used Python to give it a try (libraries: pyvisa + pyvisa-py).
Since I was able to get up and running much quicker than I expected, I decided to make an article so others may try and approach the automated and long repeated test practice for their own stuff.
Why/when using remote measurement?
Imagine the following example scenarios:
- You have built a power supply and decided to enclose it in a plastic box because you think it won’t generate heat for the usage it will serve. But before sending it to your friend who asked you to build it, you’d like to verify your assumptions.
- You have a defective power supply and need to leave it on for a long time to be able to catch the glitch.
- You have built your new audio amplifier and you’d like to make sure it can handle a certain load with a full 100% duty-cycle.
- Your mains voltage is fluctuating a bit too much and would like to verify that.
In all those cases you need to be able to do repeated measures of your variable (temperature, voltage, current, …), in a dependable way and for a potentially very long time (i.e. some days), and review the results at the end of the test session without losing any data. in other words you need a database for storing all the measured data and be able to do your stats on that.
You can easily accomplish this using your computer, improving the quality of your projects when needed, even if you’re a hobbyist maker (like I am) because we all want to do quality stuff when we need it.
Example results preview
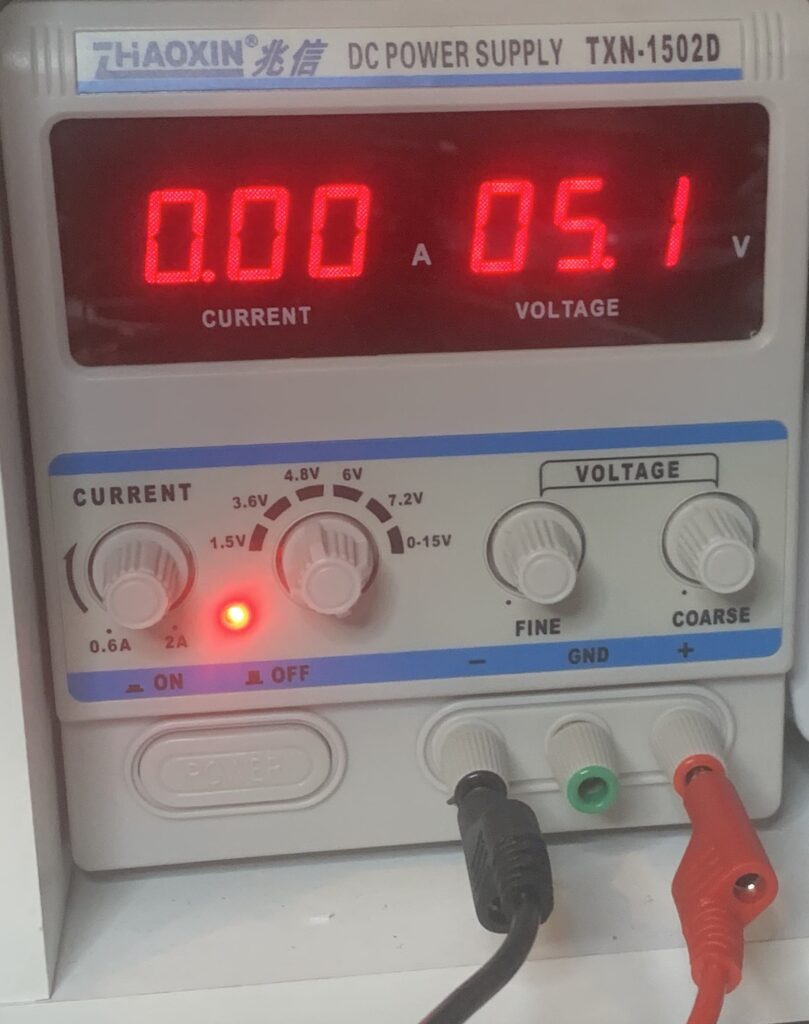
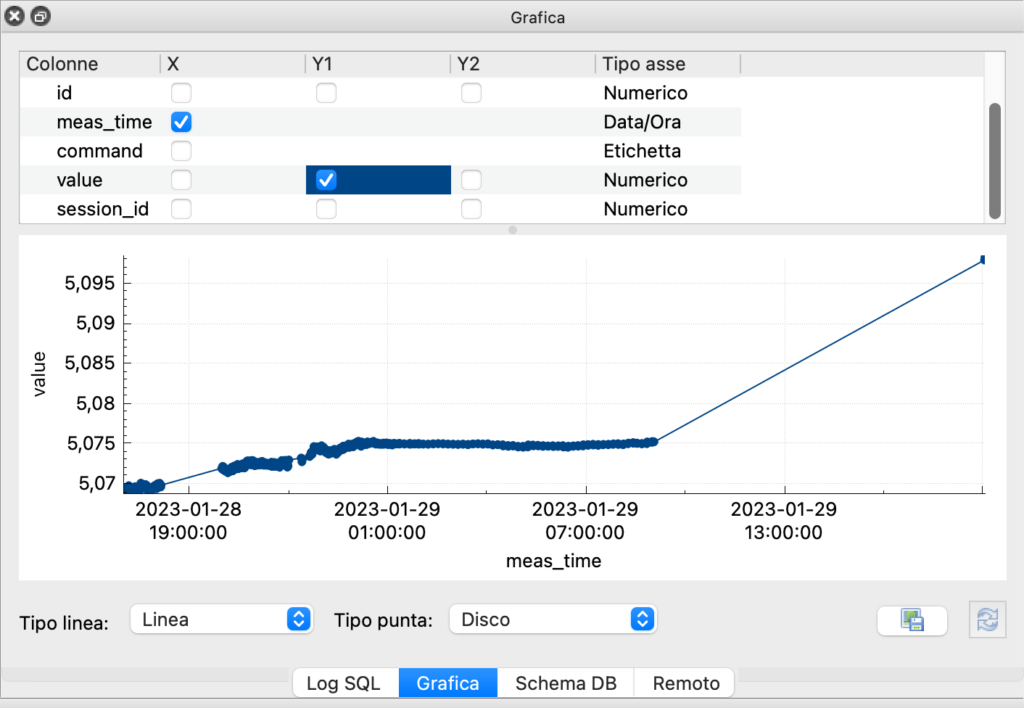
I wanted to measure the voltage stability of a LM317 based variable power supply:
First hour of logging:
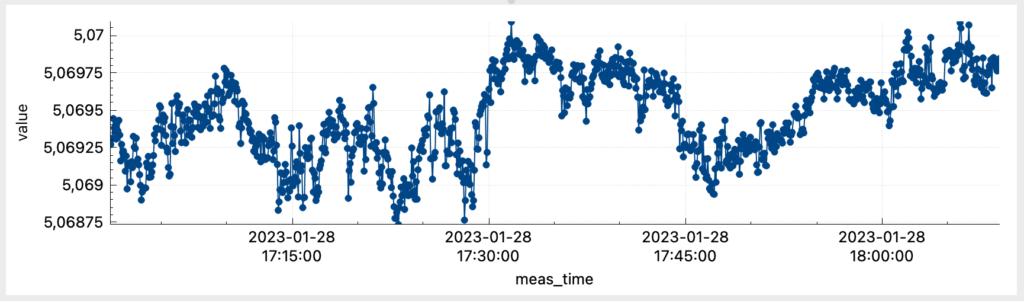
So far so good, but look at what happened during the night:
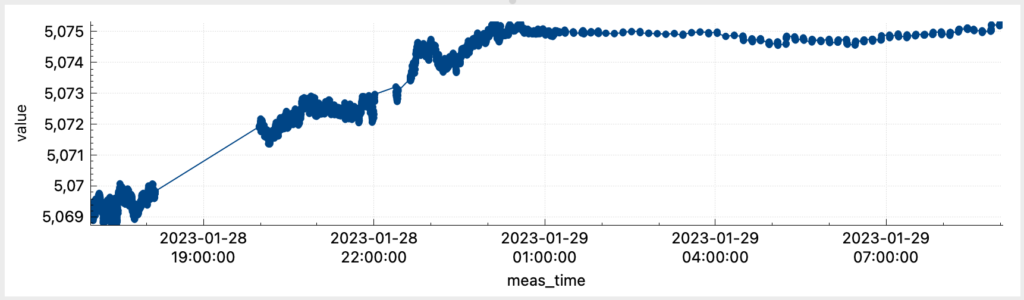
We can safely say that we had a drift in the output voltage after a few hours. Such effect is due to several possible causes, including drift in temperature (not only in the device under test, but partly also in your DMM!), knobs & pots, LM317 parameters, …
The overall voltage variation is about 6 mV in 12 hours, negligible in most use cases, but would I have been able to detect and measure it without such a feature? More importantly, now I know that my PSU will drift no more than approx. 12 mV / day, which is something I can take into account form now on in my projects.
Another example:
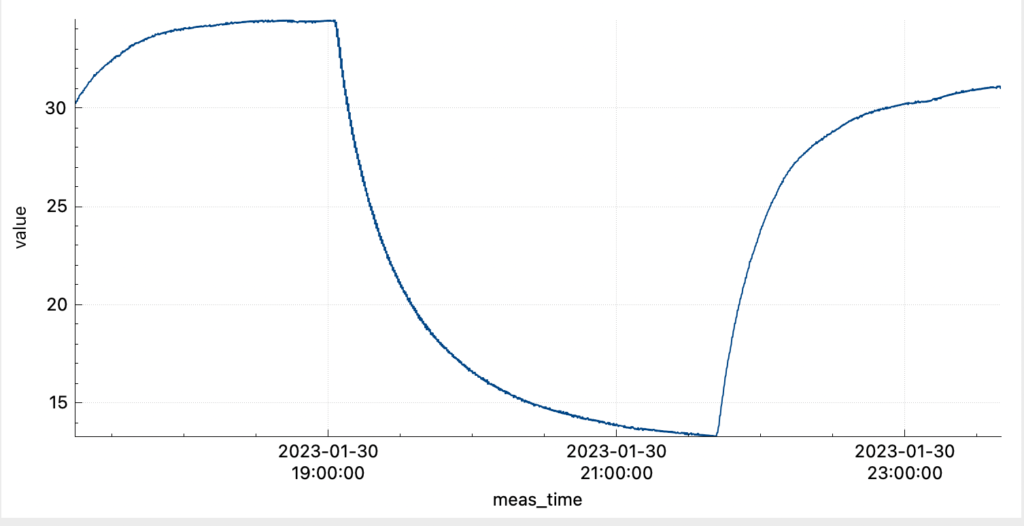
Note that Toff= Tambient
which shows the temperature excursion between the OFF and ON state in a power supply under test, having Vout=5V and Iout = 1A. Used a cheap K-type thermocouple.
Setting up your environment
To get up and running using my Python setup you’ll need to install the following tools:
- PyCharm CE, a full featured Python IDE (on Windows you may need to install Python too)
- DB Browser for SQLite, a graphical tool to browse SQLite database files
- simple graphics included
- CSV export and much more
My environment is an Apple M1 Macbook Air. Some details on your procedure may differ a bit from mine.
Now connect your SCPI enabled DMM to your network. Setup its TCP/IP to have it added in your network. Assuming you’re using DHCP, you’ll want to check for its successful IP address assignment (either in the DMM’s settings panel or in your router DHCP leases page). No IP address -> no connection for sure, so have this done as your first step!
Python project setup in PyCharm
Let’s now create a new Python project from PyCharm. Menu “File -> New Project…” will open the following popup:
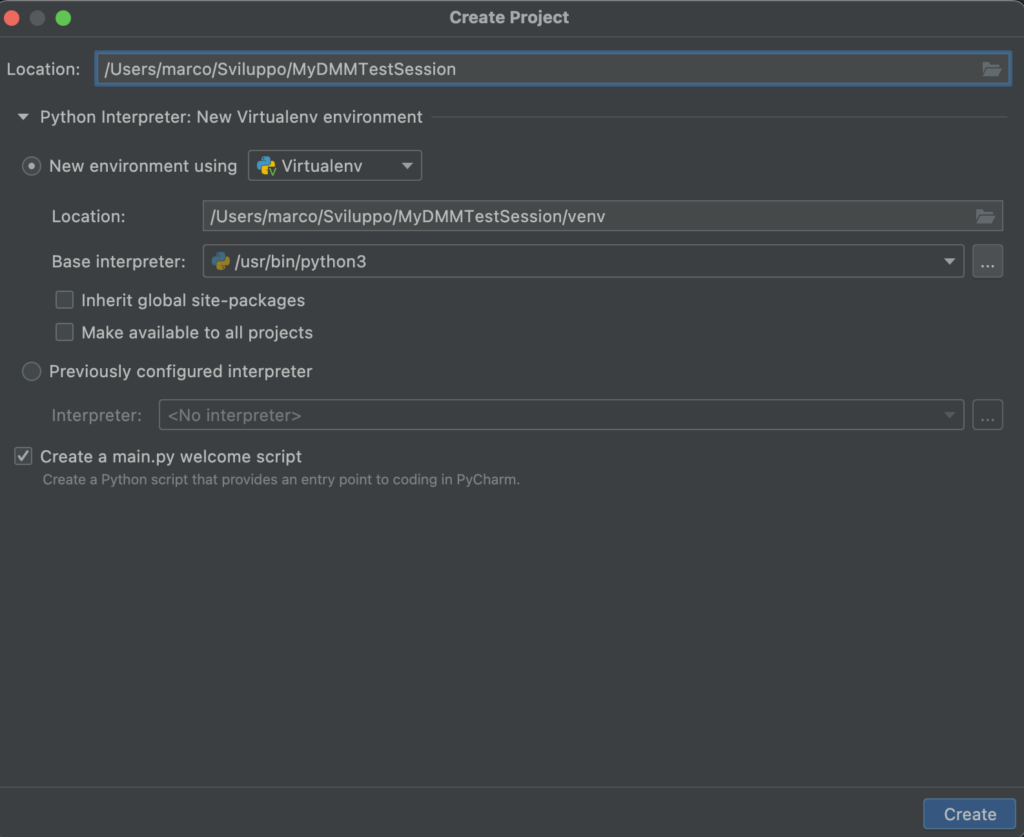
where I’d suggest you to select “New Virtualenv environment” like you see in the above screenshot. This will keep the downloaded libraries local to the workspace, making your project more easily portable to other computers. It will also stabilize the interpreter and libraries versions for your project so you won’t experience unexpected breaking changes due to libraries updates at system level.
The Location field sets the project’s root folder. Once you’ve chosen your best fitting folder, click the “Create” button (bottom right), that should open your new project workspace.
Our Python program will use pyvisa (https://pyvisa.readthedocs.io/en/latest/index.html) and pyvisa-py (you don’t need to install NI Visa thanks to pyvisa-py, an open source replacement to the NI Visa library).
To install the libraries, just click the “Python Packages” bottom tab and search for pyvisa and pyvisa-py:
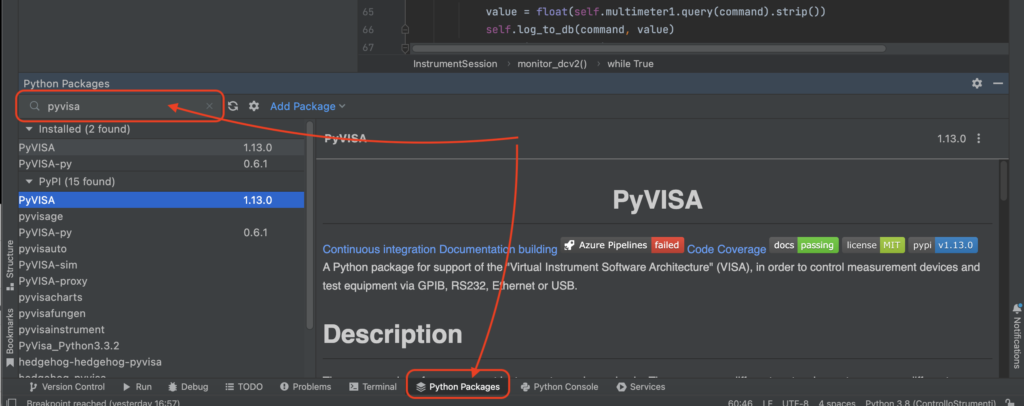
and click on the “Install” button that you’ll find on the right side of the descriptive panel.
Make sure you install at least pyvisa, pyvisa-py, psutil and zeroconf.
Once done you’re ready to connect to your instrument.
Connecting to the DMM
First thing first, try this:
import pyvisa

rm = pyvisa.ResourceManager('@py') # '@py' tells pyvisa to use pyvisa-py as backend library
resources = rm.list_resources()
print(resources)
You should see an output like this:
('TCPIP::192.168.1.232::INSTR',)
which means your instrument has been found! If you have more than one, the output tuple will show more entries. Now let’s connect to our instrument and get its IDN which is the identification string:
for resource in resources:
    instrument = rm.open_resource(resource) # this will connect and return an object representing our DMM
    instrument_id = instrument.query('*IDN?').strip()
    print(instrument_id)
If we have only one instrument we don’t really need a for loop but let’s focus on the rest of the code first.
Each resource is a string, i.e. ‘TCPIP::192.168.1.232::INSTR’.
By calling rm.open_resource(resource) we are connecting to the DMM and getting an object representing it. We assign it to the instrument variable.
By querying ‘*IDN?’ we are asking instrument to return its identification string.
The print output will be something like the following if you’re connecting to a Siglent DMM:
Siglent Technologies,SDM3065X,<my DMM serial>,3.01.01.10
which is a unique string.
In general, your LAN may have more than one instrument, even if not today.
Your instruments are likely be configured via DHCP in order to keep the network configuration easier. Therefore, your resource string ‘TCPIP::192.168.1.232::INSTR’ is subject to change and it’s not a good identifier for your multimeter.
That’s the reason we are keeping the for loop, because we’re adding the following to our code:
import pyvisa

rm = pyvisa.ResourceManager('@py') # '@py' tells pyvisa to use pyvisa-py as backend library
resources = rm.list_resources()
multimeter1 = None # here we'll assign our multimeter instrument
for resource in resources:
    instrument = rm.open_resource(resource) # this will connect and return an object representing our DMM
    instrument_id = instrument.query('*IDN?').strip()
    if instrument_id == 'Siglent Technologies,SDM3065X,<my DMM serial>,3.01.01.10':
        print('Using multimeter 1: ' + instrument_id)
        multimeter1 = instrument

# my test code starts here...
This allows us to find our DMM by its unique ID and assign it to our variable multimeter1. The for loop will be good for when we’ll add more instruments and we’ll need to decide which is our multimeter A and which is our multimeter B.
Requesting measurements
Let’s now ask our multimeter to read a DC voltage. This is as easy as a single line of code:
voltage_string = multimeter1.query('MEAS:VOLT:DC? AUTO').strip()which will print something like:
+5.09841574E+00
And there it is! Our expected 5V DC reading! Please note we had to .strip() the string returned by the DMM as it has some trailing blank characters.
Saving our measurements to a database
So far so good: we have connected to our DMM and got values. Now to the data logging feature. Again this can be very easy. Python has a native ability to deal with sqlite3, a very lightweight and widespread file db used by a large number of programs.
Let’s create a database and create our table to store our measurements:
import sqlite3
dbconn = sqlite3.connect('my_measurements.db')
dbconn.execute('''CREATE TABLE IF NOT EXISTS MEASURES (id INTEGER PRIMARY KEY AUTOINCREMENT, meas_time
TIMESTAMP NOT NULL, command TEXT NOT NULL, value TEXT NOT NULL)''')
dbconn.commit()
which creates (if not already there) a new file “my_measurements.db” containing our database, along with a table named “MEASURES”, containing an auto-increment field id, a timestamp meas_time, and our value, which is stored as text. All the fields are not null, meaning that the database will accept a new row only if all the field values are not empty.
Just add the following snippet to keep logging until you terminate the program:
import datetime
import time

while True:
    command = 'MEAS:VOLT:DC? AUTO'
    val_string = self.multimeter1.query(command).strip()
    value = float(val_string)
    now = datetime.datetime.now()
    dbconn.execute('INSERT INTO MEASURES (meas_time,command,value) VALUES (?,?,?)',
                   (now, command, value))
    print'Inserted measured value: ' + command + ', ' + str(value))
    dbconn.commit()
    time.sleep(5)
… and you’re done, although in a very basic setup!
To stop the program, hit the stop button in PyCharm’s “run” panel or click on the menu “Run -> Stop ‘main'”.
Viewing data
It’s time to open DB Browser for SQLite.
Click the “Open Database” button and select the database file.
It will open up the file and show the database structure. Now click on the “Data navigation” tab and select the MEASURES table and you’re done! You’ll see a panel like this:
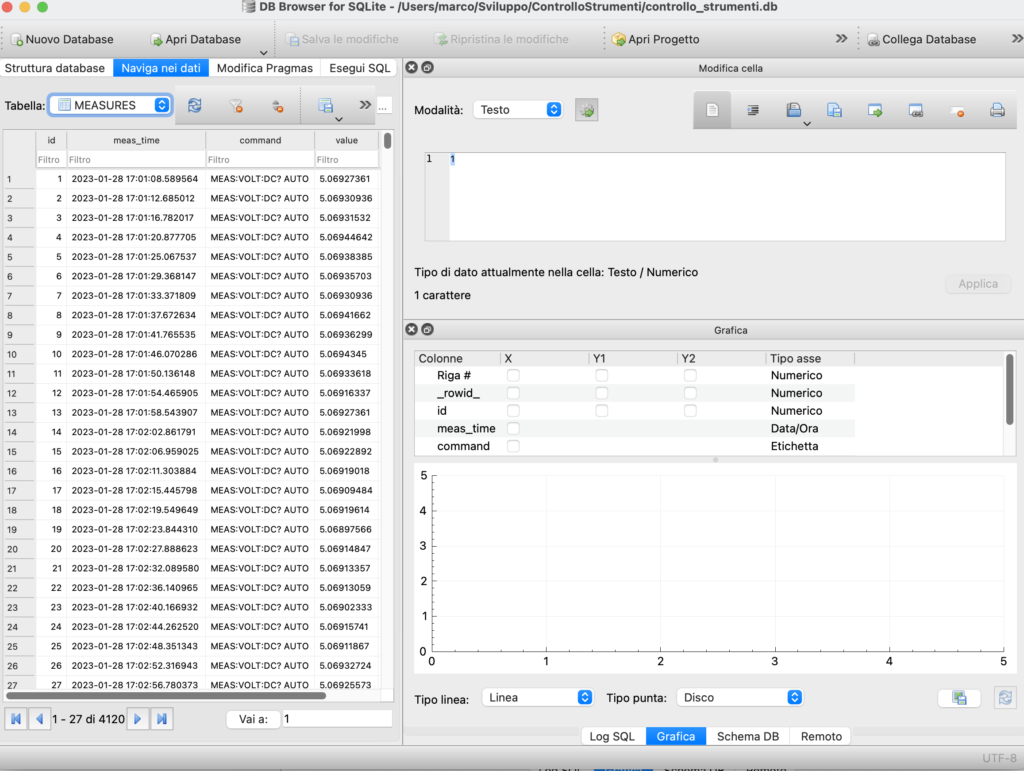
You can sort by id descending, and refresh the data view by hitting the refresh button you see near the MEASURES table selector. On the right panel you can view a graph of your data, selecting meas_time as the X variable and value as the Y1 variable:
You can filter the values on the table, the graph will update accordingly. You can also save the data as CSV and work on it using your preferred spreadsheet to add more graphics and functions to your analysis.
Caveats / further developments
VISA Timeouts
You might notice that sometimes you get timeout exceptions querying your instrument. To fix this you need to protect your query invocation in a try..except clause, like this:
command = 'MEAS:VOLT:DC? AUTO'
while True:
    try:
        val_string = self.multimeter1.query(command).strip()
        value = float(val_string)
        now = datetime.datetime.now()
        dbconn.execute('INSERT INTO MEASURES (meas_time,command,value) VALUES (?,?,?)',
                       (now, command, value))
        print'Inserted measured value: ' + command + ', ' + str(value))
        dbconn.commit()
        time.sleep(5)
    except pyvisa.errors.VisaIOError as v_e
        print(v_e)
This will print errors on the python console but won’t stop the program.
You also might want to do more complicated stuff than simply querying ‘MEAS:VOLT:DC? AUTO’.
Multi-statement tasks
The documentation shows multi line settings for many tasks. How to do that?
Your instrument object does not only have the query method, it also has write. Example:
command = 'CONF:VOLT:DC ' + scale
multimeter1.write(command)
command = 'SAMP:COUN 1'
multimeter1.write(command)
while True:
    # Faster than calling 'MEAS':
    command = 'READ?'
    val_string = multimeter1.query(command).strip()
    value = float(val_string)
    ....
Conclusion
This post is a bit longer than I initially wanted, but I hope it will serve for getting started on remote programming a SCPI bench DMM. I hope you’ll be able to setup your long test session and be succsessful in getting the most out of your DMM and your projects!