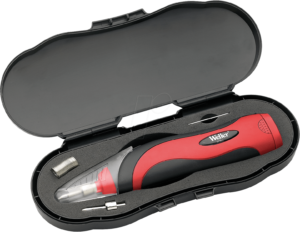
Weller Bp865Ceu 6W-8W saldatore portatile a batterie


Ho acquistato questo saldatore portatile a batterie come ausilio per fare saldature a stagno in punti dove non arrivano né la 220V né la 12V DC e mi sto trovando bene, quindi ho deciso di condividere una piccola recensione.
Per la cronaca, a casa ho una stazione saldante Weller WSD-81 (per me un vero gioiello, non saprei che difetto trovarle) e un saldatore a stilo tipo JBC da 40W, che mi porto in giro, mentre avevo anche un saldatore da 12V con attacco accendisigari che però ho buttato perché si scaldava poco e lentamente. Odiavo il fatto che avesse un puntale pesante quasi come il JBC, ma che non si scaldava mai. Perché non fare un puntale leggero che a quel punto si sarebbe scaldato prima e meglio?
Questo Weller Bp865Ceu fa esattamente questo. Puntale di massa ridotta che quindi si scalda (e si raffredda) velocemente, arrivando in temperatura molto rapidamente. Con solo 6-8W di potenza un puntale leggero è una scelta obbligata che mi trova pienamente d’accordo.
Ho subito rimpiazzato il puntale conico con l’altro in dotazione, quello “a cacciavite”, per aumentare la superficie di contatto con le parti da saldare.
Finora problemi zero, funziona benissimo. Facile da impugnare, pesa più o meno come le 4 batterie AA montate, quindi più di uno stilo tradizionale, ma questo non compromette la saldatura.
L’ho usato in barca per una modifica a un circuito direttamente dentro la sua scatola in PVC e mi sono trovato benissimo, riuscendo a dissaldare un componente vicino al bordo scatola, senza toccarlo, e saldare il sostituto senza bruciare nulla. La punta sottile facilita molto il lavoro, e la potenza ridotta qui è anch’essa un vantaggio: aiuta a fondere solo la parte a contatto senza dissaldare componenti adiacenti. Il cappuccio permette di riporre il saldatore nella cassetta senza il rischio che si possa accendere. Ottimo. Ho tolto il JBC dalla cassetta degli attrezzi!

Come si vede nel video, in una decina di secondi inizia a fondere lo stagno 60-40 (per la precisione Sn60Pb38Cu2), che ha il punto di fusione a 188 gradi, e in un tempo analogo anche lo Sn99Ag0,3Cu0,7 – ma quest’ultimo ha un punto di fusione almeno 30° più alto.
Consiglio l’uso di stagno sottile (non più di 0.6mm) in quanto più preciso e dissipa meno calore. Come lega, per chi è alle prime armi forse è meglio stare sul il Sn60Pb40 o similare, che fonde prima delle varianti prive di piombo.

Se dovete saldare spesso parti in rame di grossa sezione, siano esse lamine o cavi e dovete farlo lontano dalla 220V, 8W non bastano: meglio un saldatore a gas, che però fatica a stare sotto i 500° e se lo usate su un PCB rischiate di bruciare i componenti o di staccare le piste di rame!
Se dovete fare saldature di componenti elettronici su PCB o comunque di cavi e componenti che non siano di potenza, come nel mio caso, è un prodotto molto soddisfacente.


73 de IU3JSX
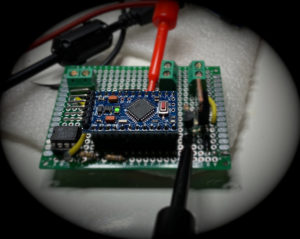
Arduino Pro Mini clones 12V supply and 4B2X regulator

Yesterday I was working with a Chinese clone of Arduino Pro Mini, which I bought for less than 10€ at Amazon.

I needed to build a very low consumption device and after reading this article I found the Pro Mini to be perfectly suited for the purpose.

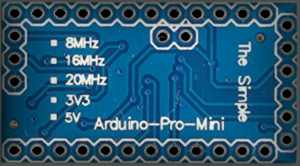
The clone is one of those labeled with “The Simple”  in the back of the PCB, as shown here:

For my project I had to use 12V DC input so I fed it by the RAW pin, as described in the Arduino Pro Mini documentation.

I programmed it trough an Arduino Uno, everything went good so I decided to put it into the final circuit.

Long story short, it fried immediately after supplying 12V.

I was surprised by such a behavior so I checked back in the documentation a few times, but everything looked correct, it had to work. I looked at the PCB schematics in the Pro Mini documentation and found the regulator to be the MIC5205. The datasheet shows max operating voltage =16V, ensuring safe and reliable operation at 12V.

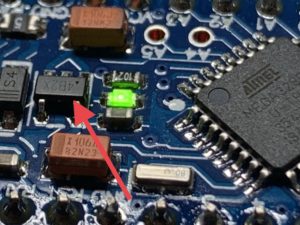
I looked at my board and found out the regulator was not a MIC5205, but a “4B2X” instead (it must be some clone, I can’t find its datasheet UPDATE: thanks to Squonk42 who commented back: https://www.torexsemi.com/file/xc6205/XC6204-XC6205.pdf), so I searched the web and found this discussion on the Arduino Pro Mini Chinese clones and their voltages, in which some regulator labels are listed, including  KB33, S20K, F34V, L0RA, L0RB for the 3.3V variant. 4B2X was not showing up, so I started to suspect either a defective component or an out-of-specs regulator.

I then decided to test another new Arduino Pro Mini board that came with the same “4B2X” regulator as the fried one, and started supplying 5V to the RAW pin, increasing the voltage at small steps, to find wether or not it was capable of working with a 12V supply voltage (as stated in the Arduino Pro Mini documentation).

The regulator output stayed at 3.3V until up to about 11.5 V input, then a single increase of 0.2V made the output “run away”, all the way up to the input voltage, frying the microcontroller. The exact same input/output behavior was delivered by the regulator of the first failed board.

Looks like the 4B2X regulator is not suited for 12V, its maximum input voltage being just about 11.5V, well below the MIC5205’s 16V maximum, which is needed in car/boat/camper environments that use Pb 12V batteries, where voltages typically grow up to 13.8 – 14.4V when the engine is on.

In conclusion, if you bought an Arduino Pro Mini clone that comes with that regulator and you need to supply a 12V DC voltage, consider adding a zener diode (5V at least) to drop the voltage down to safe values. Even better, if you have a spare MIC5205 or a real equivalent just solder it in place of the 4B2X.

Hopefully this will avoid someone frying his new Arduino Pro Mini just like it happened to me.

73 de IU3JSX